How to Add Translated Subtitles to YouTube Videos with ViiTor AI (FAQ Included)
1.Introduction
Over 5 billion videos are watched every day on YouTube and 70% of those viewers are from outside the U.S. You can make your content available to people of all languages by adding translated subtitles. There are easy ways and tools that you can use to quickly and easily translate your YouTube videos .
2. Why Should You Add Translated Subtitles to Your Videos?
- People from all over the world can watch your movie, no matter what language they speak.
- With subtitles, your content can be seen by people who have trouble hearing or who prefer to watch videos without sound.
- Videos with subtitles tend to get more likes, shares and watch times.
- Subtitles in different languages make it easier for search engines to find your content.
3.Using AI Tool
If you’re looking for a good mix of speed and accuracy, an AI translation tool is your best bet. A platform like ViiTor is great because it creates high-quality AI subtitles, and you can even just paste in a YouTube link. It works even if the Youtube video doesn’t have any captions (CC) to start with, making it super easy to get professional results.
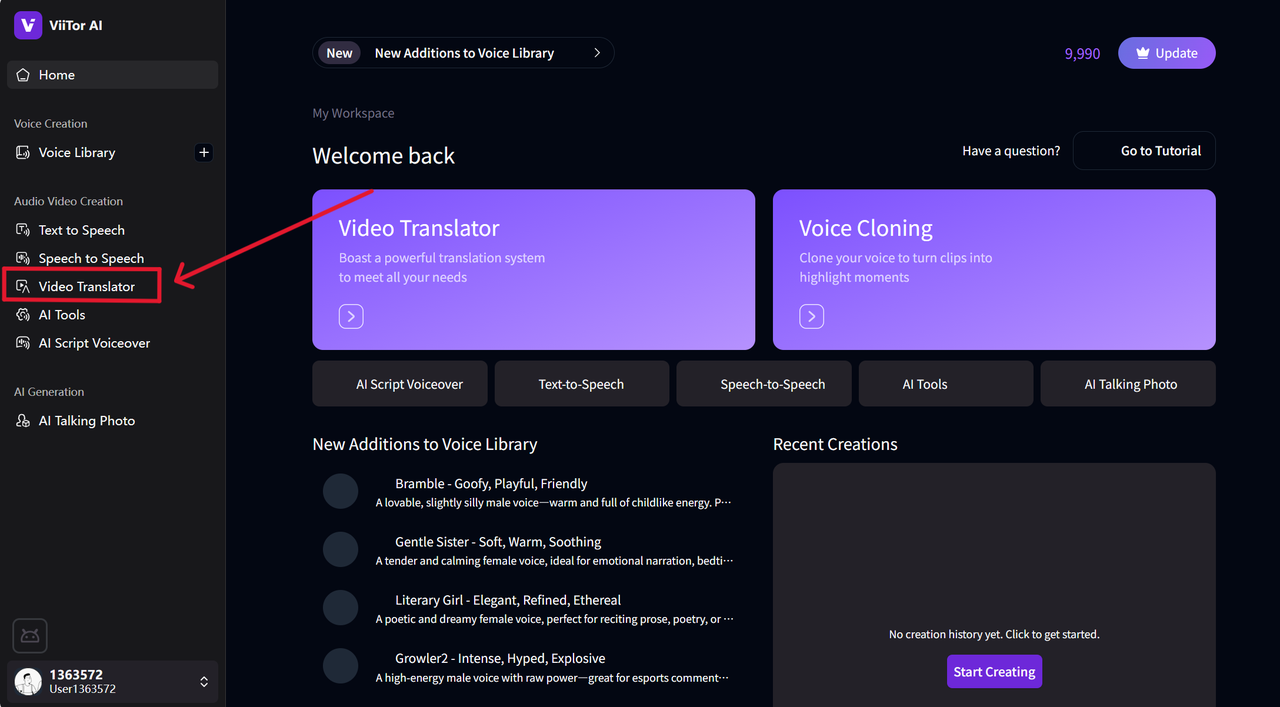
Step 1: Upload Your Video
1.Visit “ViiTor AI” and sign up for an account.:https://www.viitor.com
“Upload your video” file.
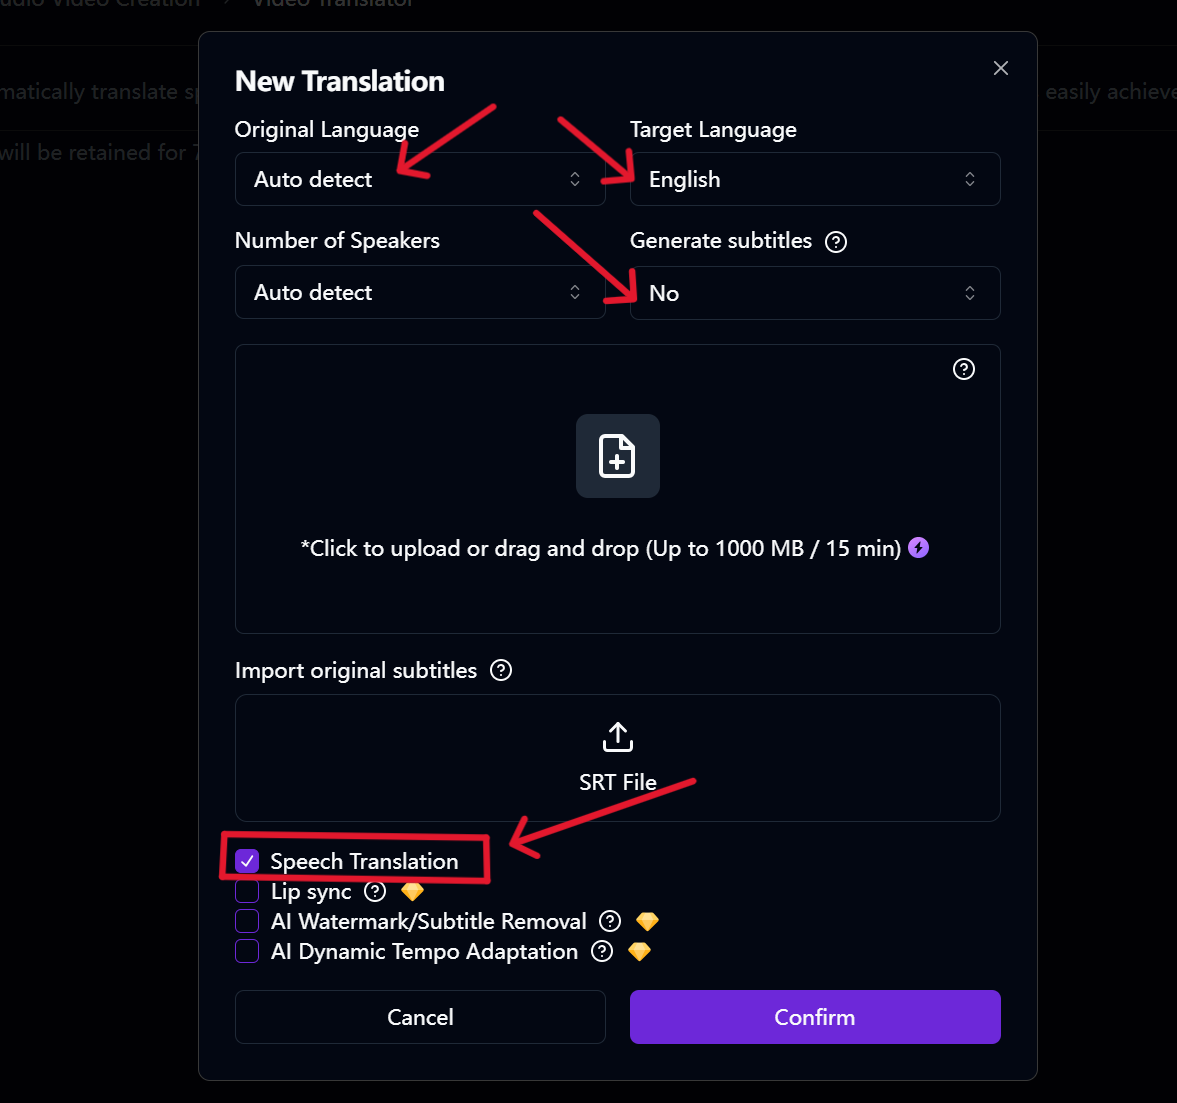
Step 2: Select Languages and Options
Upload your video in a minority language, select the same language as the video in "Target language" (for example, if the video is in English, select English), select "Original subtitles" for subtitle generation, and uncheck the "Translate audio" option. In this way, the system will only transcribe the voice into original text without translating it.
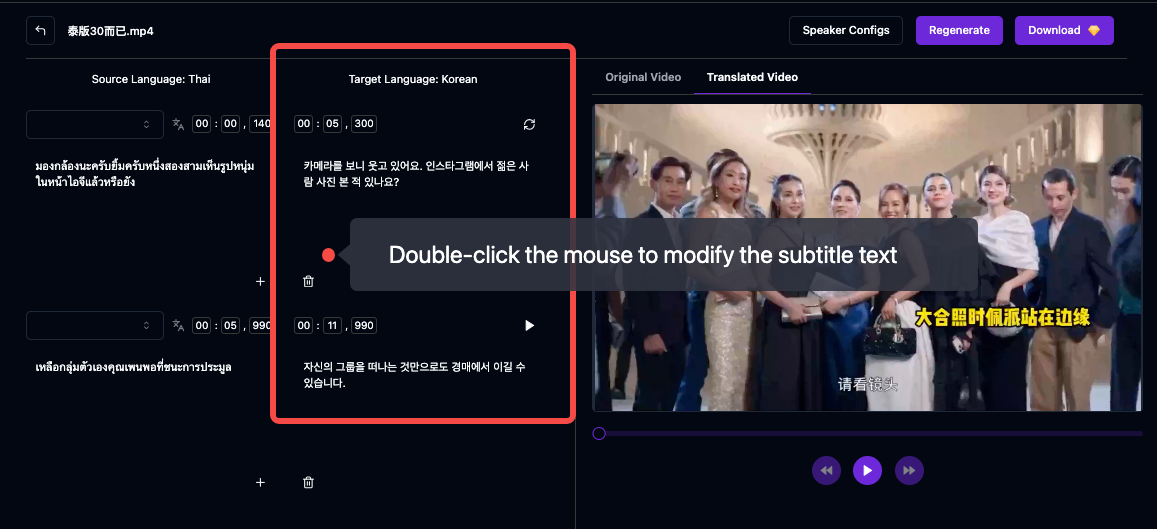
Step 3: Review & Edit the AI-Generated Subtitles
After the video processing is complete, Vozo AI will automatically generate subtitles.
Pro Tip: ViiTor AI offers two options for your YouTube videos:
- For subtitles only: Export the SRT file and upload it to your existing YouTube video.
- For dubbing and subtitles: Export the complete translated video from ViiTor AI to upload directly to your channel.
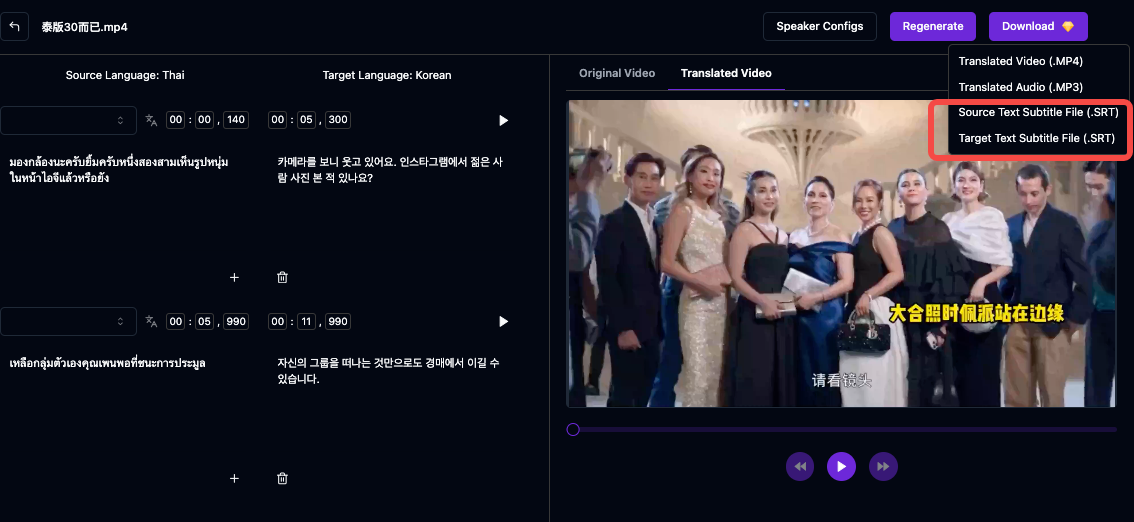
Step 4: Download and Upload the Subtitle File to YouTube
If you only want to add translated subtitles, you may simply export the subtitles as a SRT file.
Then open “Youtube Studio”, find the “Subtitles” option on your videos.
Select the SRT file exported from ViiTor AI and upload it to your videos.

Pros and Cons of AI Subtitle Tools
Pros
- Save Time and Work Quickly:AI subtitle tools make it much faster to make subtitles than doing them manually.
- Accurate and Customizable:AI tools can help you get high accuracy and customize subtitles to suit your needs.
- Budget-Friendly Option:AI subtitle tools are much cheaper than hiring someone for manual translations.
Cons
- Subscription Costs:Some AI Tools might need paid plans to translate subtitles.
Best For
AI tools allow you to work on multiple subtitles rapidly. Creators who want accurate subtitles without having to spend a lot of time or work on them must use this.
4.Using YouTube’s Auto-Translate Feature
The easiest way to add translated subtitles is with YouTube’s auto-translate feature. To enable it, you first need to publish the auto-generated captions in your video’s original language:
Step 1: Create or Review Auto-Generated Captions in the Original Language
- Log in to YouTube Studio.
- Go to the “Content” tab
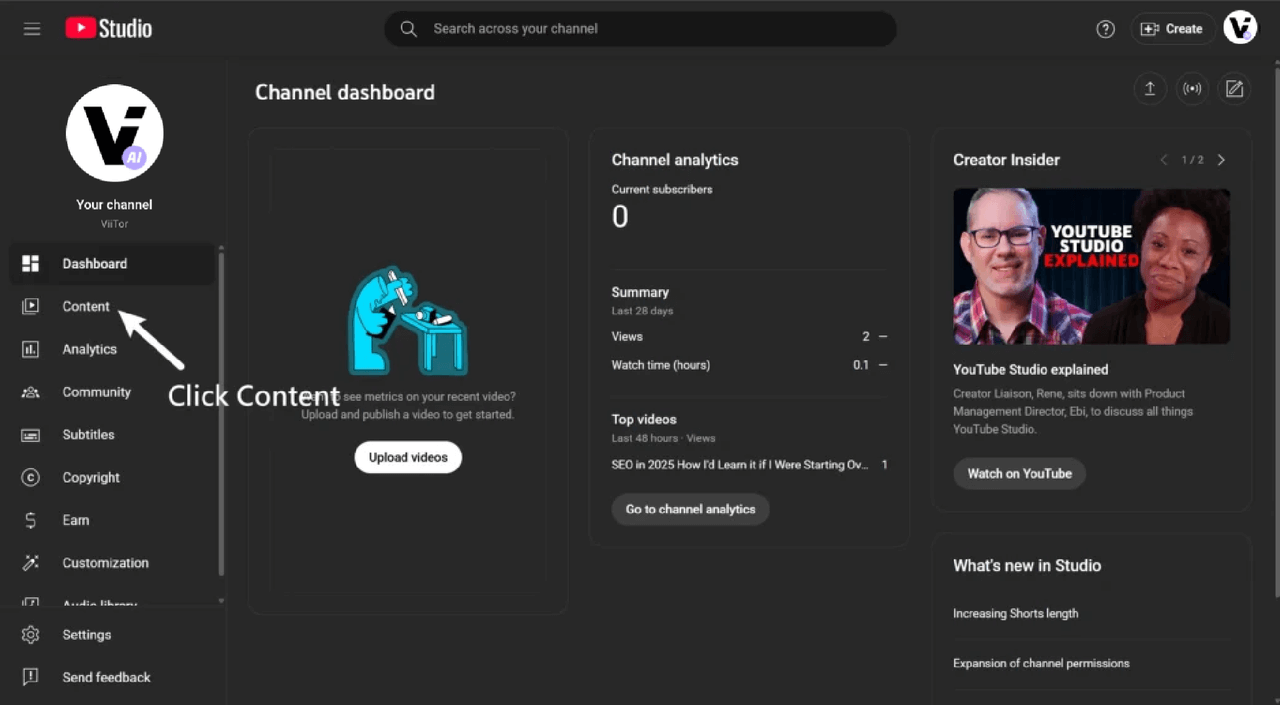
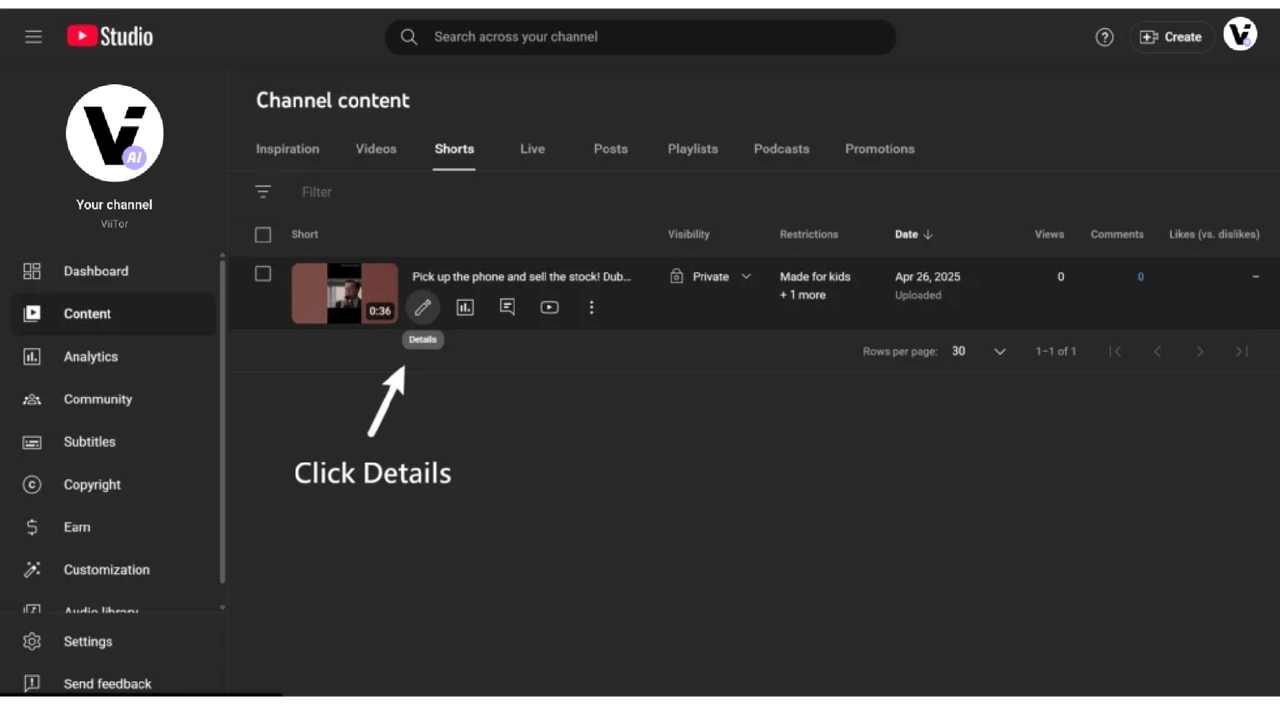
Select the video you want to work on.
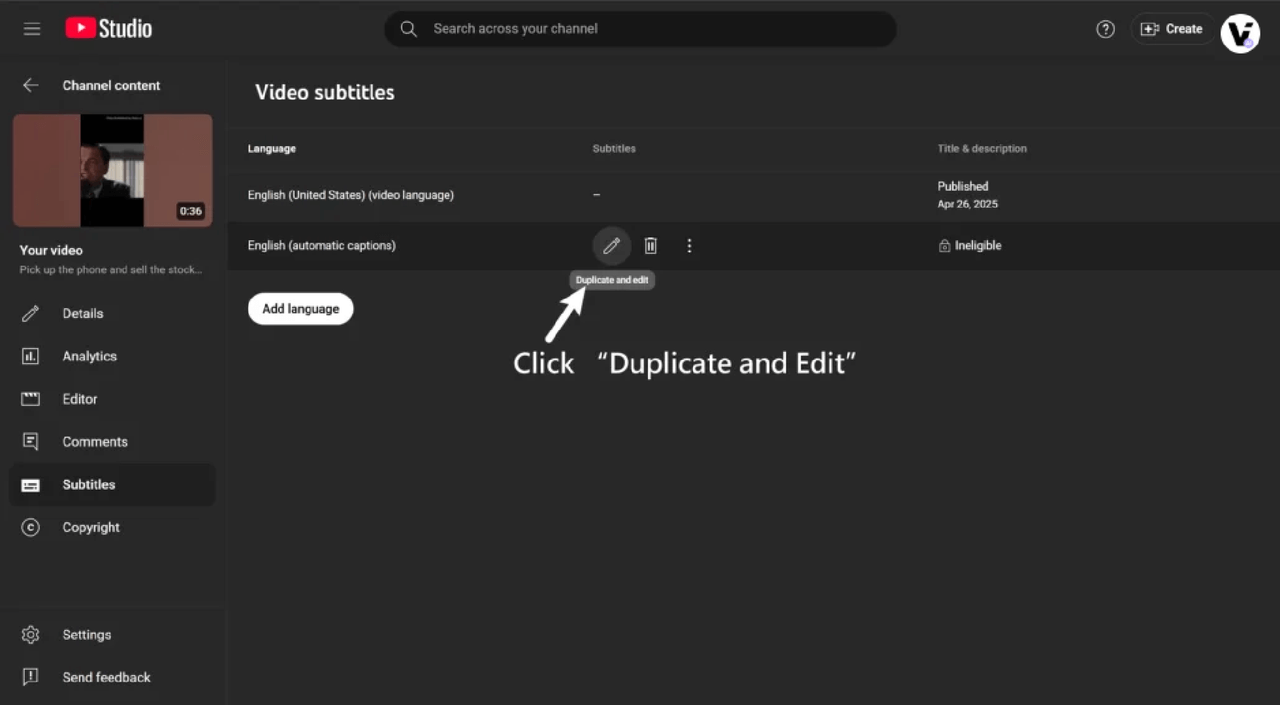
Navigate to “Subtitles” and find the auto-generated captions in the original language (e.g., English).
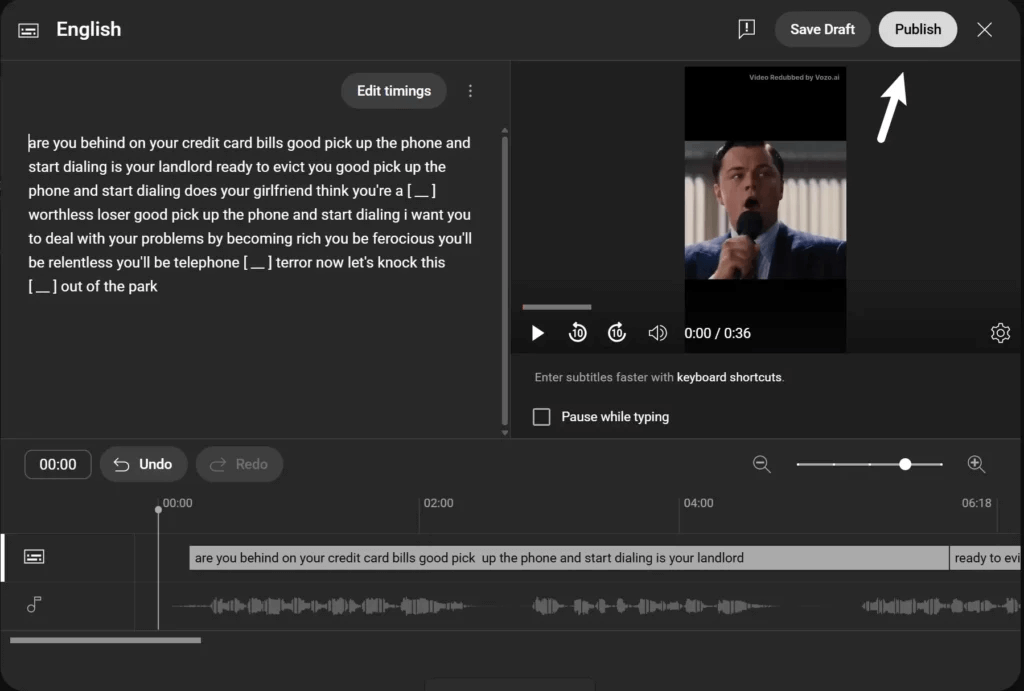
Click “Duplicate and Edit” and review the captions for accuracy.
Click on “Publish” when it is ready.
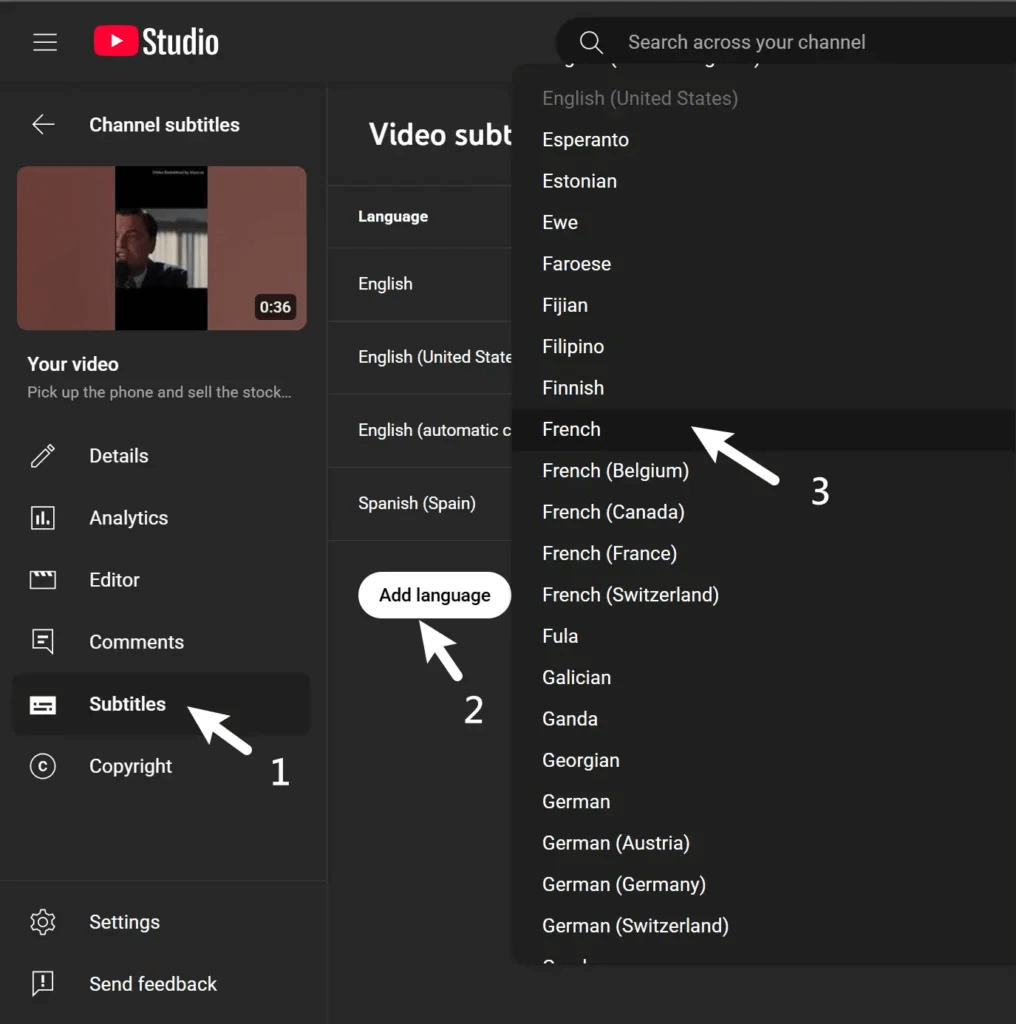
Step 2: Enable Auto-Translation to Your Target Language
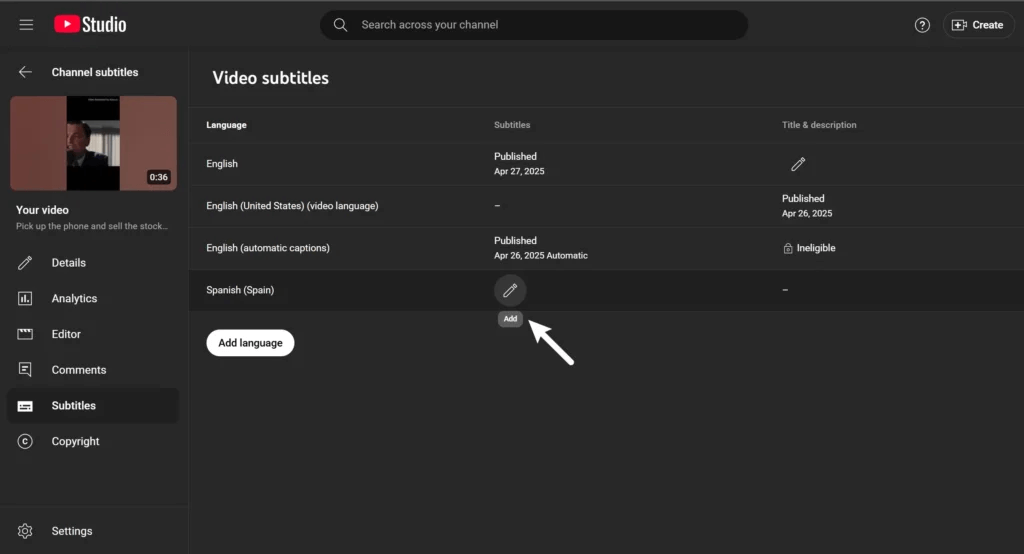
1.You can return to the “Subtitles” section after publishing your original captions.
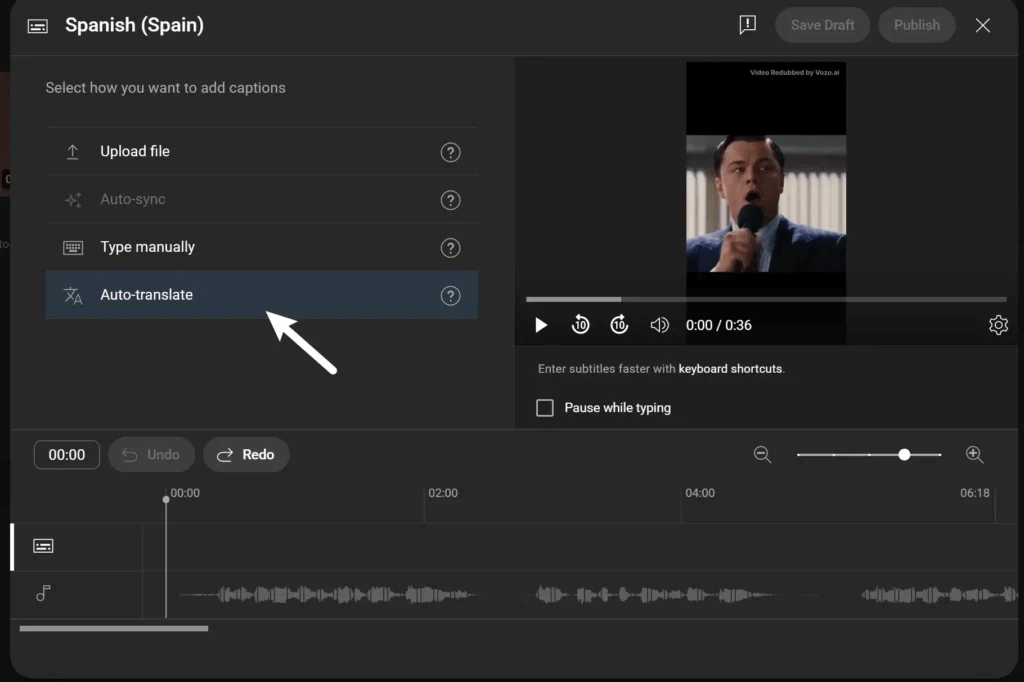
2.Click “Add Language” and select the language you want to translate in (e.g., Spanish).
3.Click “Add” under the language tab.
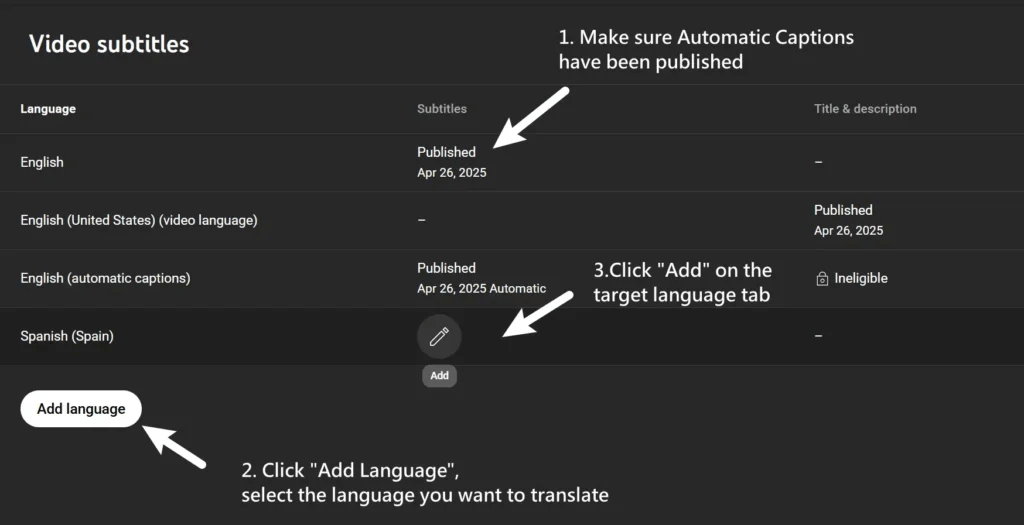
You’ll now see an “Auto-Translate” button. Click it, preview the translation and hit “Publish”.
Pros and Cons of Auto-Translate
Pros:
- It’s Free and Fast :You do not need to wait or pay anything. Auto-Translate is free and quick which can add languages easily and quickly
- Integrated:Auto-Translate feature is a part of YouTube Studio which allows you to access it easily and use it without the need of extra tools or software.
Cons:
-It Can Be Inaccurate:If your content has specific language or idioms, the translation might not describe what you mean.
-It Offers Limited Editing:You can not change or improve the captions on the current versions.
Best For:It works best for casual content or when you do not have a lot of money to spend on translations. It is good for artists who are just starting out. You should not use it for your business or branded content.
5.Uploading Translated Subtitle Files (Full Control)
Step 1:Create and Format an SRT File
An SRT file is a text file that is used to write subtitles. Each subtitle entry is written in the following way.
1
00:00:01,000 --> 00:00:04,000
Text for the first subtitle.

2
00:00:05,000 --> 00:00:08,000
Text for the second subtitle.
After writing it, you can “save your file” with the .srt extension (e.g., subtitles.srt).
Pro Tip:If you want accurate subtitles in a different language, you should translate the dialogue manually or hire an expert translator.
Step 2:Upload the Translated Subtitles to YouTube
Go to “YouTube Studio”.

Select the video you want to add subtitles to.
Navigate to “Subtitles”.
Click “Add Language” and choose your target language.
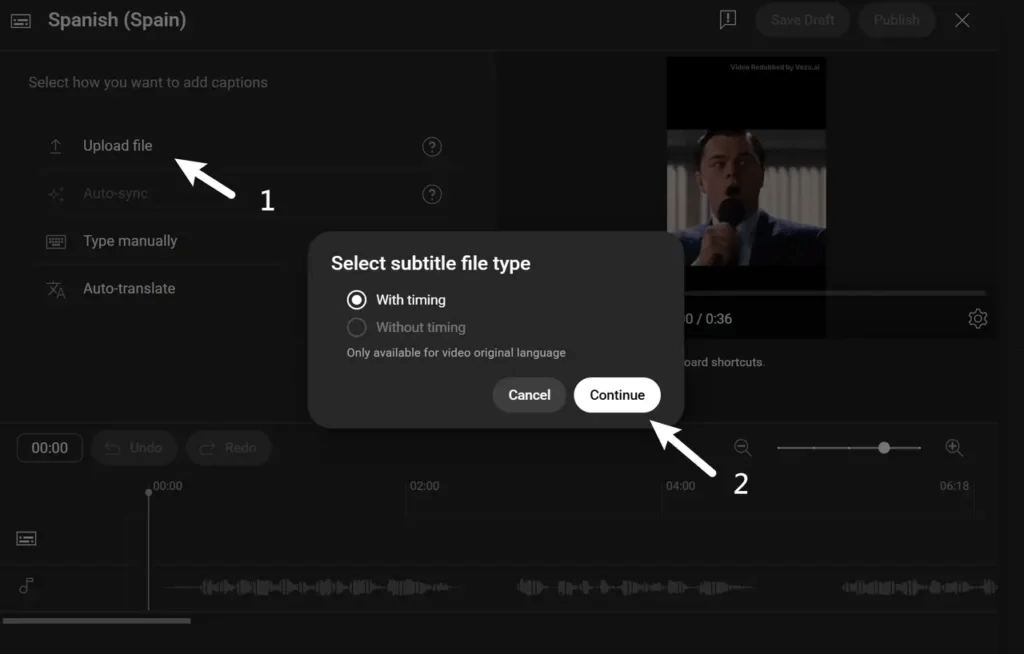
Under “Subtitles” for the target language, click “Add” and choose “Upload File”.
Upload your SRT file, select With timing and click Publish.
Pros and Cons of Manual Subtitles
Pros:
- High Accuracy and Cultural Relevance:When you write subtitles manually, the results are much better. You must also include cultural relevance to make your content relevant and appropriate for everyone.
- Full Control Over Subtitles:When you write subtitles manually, you get control over the words and timing. This means you can change everything to make it fit style of your content.
Cons:
- Takes a Lot of Time:It can take a lot of time when you are writing subtitles manually, especially for longer videos.
- Costs Can Add Up:It can cost a lot to hire someone to do the job if you are not doing it yourself.
Best For:High-Quality and Professional Content.You should go for manual subtitles if you are making professional or technical content. They can help you better connect with your audience.
6.Frequently Asked Questions
Which method for adding translated subtitles is best for me?
YouTube’s Auto Translate is fast and does not cost anything, but it is not very accurate. If you want to have the most control, it is best to make an SRT file manually. For a good balance of accuracy and speed, AI tools like ViiTor AI stand out.
How accurate is YouTube’s auto-translate compared to AI tools?
YouTube’s auto-translate has problems with the context. AI translation tools like ViiTor AI can help you get better accuracy with help of advanced AI models and let you review and edit subtitles.
Is creating manual SRT subtitle files difficult?
Yes, it can be difficult to make SRT manually as you might need transcription, translation and timecoding. This needs time, language skills and technical knowledge.
Are AI Video Translation tools like ViiTor AI expensive?
AI tools are cheaper than translating manually. Platforms like ViiTor AI also offer free trials, low-cost paid plans and pricing that can be changed based on your needs.
What is an SRT file and why is it important for YouTube subtitles?
An SRT file is a text-based subtitle format with timecodes and text. YouTube uses these files to synchronize subtitles to the video. AI tools simplify the process by making well-formatted SRT files by itself.
Can I edit my translated YouTube subtitles after publishing?
Yes, you can edit your subtitles anytime in YouTube Studio. Whether you have added them manually, auto translated or uploaded them from script, you can adjust text or timings in the Subtitles section in your dashboard.
Do translated subtitles actually help my YouTube channel grow?
Yes. Translated subtitles can improve the accessibility and expand your global reach and discoverability through SEO. They can make your videos more attractive and visible to audiences all around the world.